
How to Take a Screenshot on Your Computer (Windows+MacOS)
Want to capture something on your screen and share it with others? Long story short, this is called screenshots. And if you don't know how to do that, well, you are in the perfect place.
Taking screenshots on a computer is super easy, it doesn't matter if you are a Windows or macOS user. There are several ways to do that. Even, there are shortcuts to get this job done.
Excited to learn all these tricks?
Perfect, today, in this step-by-step tutorial, we're going to show you all the methods to take screenshots on a computer. Keep reading!
How to Take a Screenshot on a Windows Computer (Including Windows 10 and 11)
If you are a Mac user, you can skip this part and check the part where we have discussed ways to take screenshots on a Mac computer. And if you're a Windows user, this part is especially for you.
You can take screenshots on a Windows computer in different ways. Here we'll discuss the most popular yet straightforward 5 ways:
- Print Screen Button Method
- Alt+Print Screen Button Method
- Windows Button+Print Screen Button Method
- Snipping Tool (Windows 7,8.1, and 10)
- Snipping Tool (Windows 11)
Now let's discuss each of the above-mentioned methods in detail and get started with the first method-
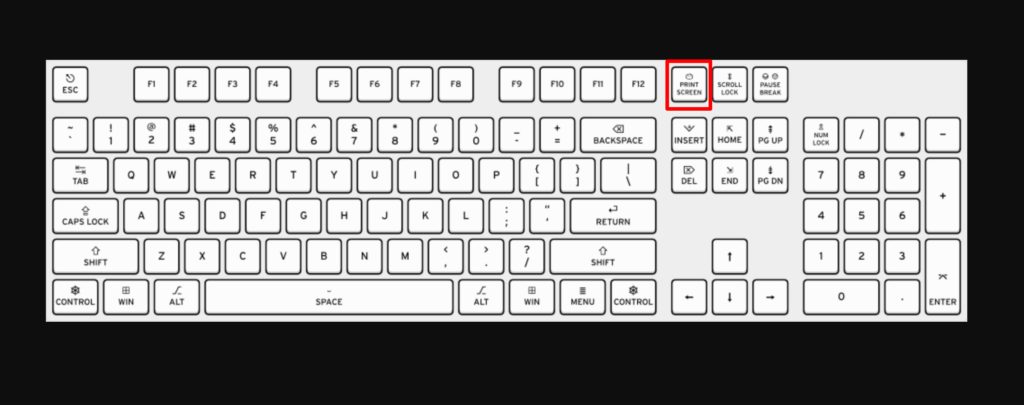
1. Print Screen Button Method
To take a screenshot in Windows, the simplest way is to use the Print Screen button (often labeled as PrtScn or PrtSc). It is usually located on the upper-right side of most keyboards or next to the Space Bar on some.
- If you press the PrtScn button, it will capture the entire screen.
- The screenshot will be copied to your clipboard.
- You can then open any program that allows you to insert images, such as Paint, Microsoft Word, or PowerPoint, and paste the screenshot by pressing Ctrl + V.
2. Alt+Print Screen Button Method
The downside to using the Print Screen button is that it captures everything that is visible on your monitor, including the taskbar, system tray, and any other open windows. This can be inconvenient if you only want to capture a specific area of your screen.
Additionally, if you have a multiple monitor setup, the screenshot will merge all of your screens together to make it look as though they are all part of one giant desktop. This can be confusing for the reader, especially if you are trying to take a screenshot of a specific monitor.
- To capture a screenshot of the active window, hold down the Alt key while pressing the Print Screen button.
- This works on all versions of Windows, including Windows XP and 95.

Like the regular method, this will copy the screenshot to your clipboard, so you can paste it into a program such as Paint, Microsoft Word, or PowerPoint to save the file.
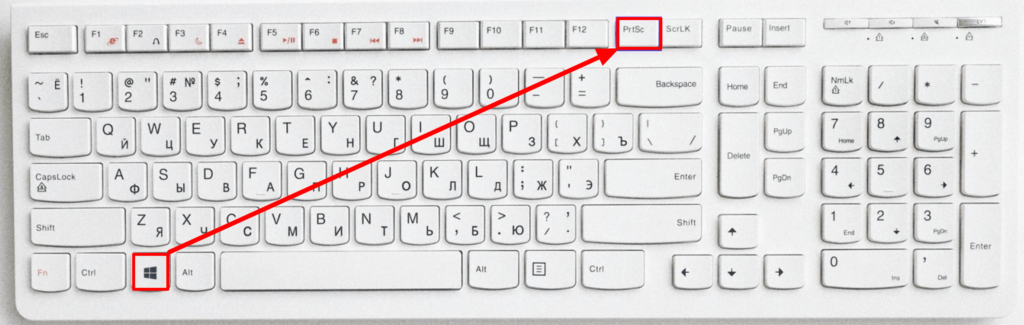
3. Windows Button+Print Screen Button Method
To take a screenshot on Windows 10 or Windows 11 and automatically save the file to the Screenshots folder, press the Windows key + PrtScn. Your screen will go dim and a screenshot of your entire screen will be saved to the folder.
On most keyboards, the Windows key is located in the bottom left corner on the same row as the spacebar.
You can find the Screenshots folder by opening File Explorer (press the Windows key + E) and clicking Pictures in the left side panel (navigation pane).
4. Snipping Tool (Windows 7,8.1, and 10)
The Snipping Tool is a great way to take all kinds of screenshots, including full-screen, individual windows, and even a particular area of the screen.
- On Windows 7, click the Start menu, type Snipping, and then click Snipping Tool.
- On Windows 8.1, swipe in from the edge, select Search, type Snipping, and then select Snipping Tool.
- On Windows 10, press the Windows key + S, type snip, and click the Snipping tool.
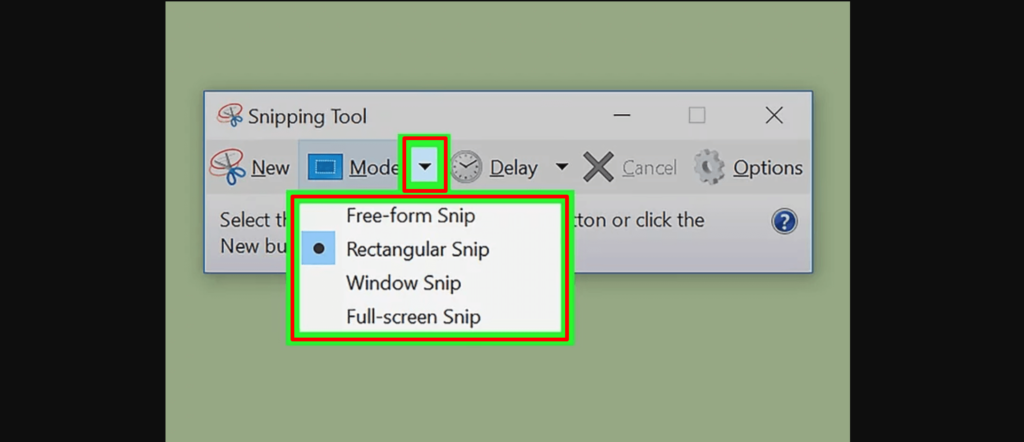
Now choose the shape of the Snip. “Rectangular Snip” is chosen by default. Click the Arrow button next to the Mode button to change the Snip shape:
- Free-form Snip: It lets you draw any shape with your mouse. The area inside the shape will be snipped.
- Rectangular Snip: It lets you select a rectangular area, which will be snipped.
- Window Snip: It allows you to choose a window to snip.
- Full-screen Snip: It snips the whole screen, with all windows included.
Click the New button to start the selection. The screen will fade, and you can draw your Snip area, or select the window if you chose Window Snip. Release the mouse to take your screenshot.
- If you had Full-screen Snip selected, your Snip will automatically be created once you click New.
Once you create the Snip, it will open in a new window. You can use the Pen tool to draw on it and make notes, and use the Highlight tool to draw attention to text.
After completing the editing part, click the floppy disk icon to open the save dialog. Now save the file by giving it a relatable name. Also, by default, the Snip is copied to the clipboard when you create it. This means you can paste it into Paint or Word using CTRL+V.
5. Snipping Tool (Windows 11)
Although the Snipping Tool exists in Windows 10, it's not usually the screenshot tool you'll want to use. In Windows 11, the Snipping Tool got a major upgrade and it's now the best way to take custom screenshots.
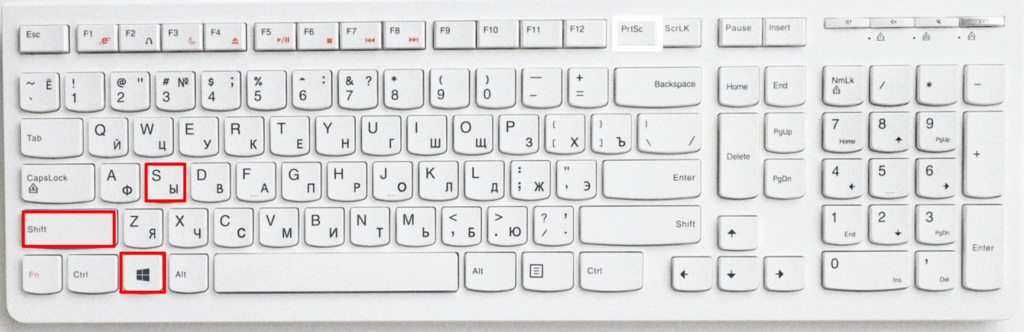
To start the Snipping Tool in Windows 11, you can search for it or press the Windows Key + Shift + S. After pressing these buttons simultaneously, your screen will go dim and a toolbar of screenshot options will appear at the top of the screen.
This toolbar will let you take a rectangular, freeform, full-window, or full-screen capture, as well as time your screenshot for the amount of seconds you'll need to pull up the window you need to capture.
After taking a screenshot, you can copy it to your clipboard, save it to the Screenshots folder, or print it immediately. Clicking the preview that appears in the bottom-right corner of your screen allows you to save and edit the screenshot further.
How to Take a Screenshot on a Mac Computer
Welcome if you are a Mac user. Because this part is for you. In this segment, we will show you 4 different ways to take screenshots on a Mac computer. So, let's get started!
- Capture the Entire Screen
- Capture a Specific Window
- Capture a Selected Portion
- Use Screenshot App for MacOS
1. Capture the Entire Screen
- Press Command (⌘) + Shift + 3 simultaneously.
- You will hear a camera shutter sound, and the screenshot will be saved as a file on your desktop.
Note: If you're using multiple monitors, it'll take and save screenshots of every monitor.
2. Capture a Specific Window
- Press Command (⌘) + Shift + 4.
- Press the Spacebar.
- Move the camera cursor over the window you want to capture, and it will be highlighted.
- Click on the window, and the screenshot will be saved as a file on your desktop.
3. Capture a Selected Portion
- Press Command (⌘) + Shift + 4.
- Use the crosshair cursor to click and drag to select the portion of the screen you want to capture.
- Release the mouse button, and the screenshot will be saved as a file on your desktop.
Every time you take a screenshot, regardless of which ways you're using, you'll see a small thumbnail preview in the bottom-right corner of your screen, which you can click to edit the screenshot. You can turn this feature on and off using the screenshot menu.
4. Use Screenshot App for MacOS
Current versions of the macOS (Mojave, Catalina, Big Sur, Monterey, and Ventura) come with a Screenshot app.
- Press Shift + Command + 5 to open the Screenshot app. A small menu panel will appear at the bottom of the screen.
- The three icons on the left allow you to take a screenshot of the entire screen, a specific window, or a highlighted section. The next two icons to the right will let you record a video of the entire screen or just a highlighted section. Click on one of the options on the left to select how you want to take a screenshot.
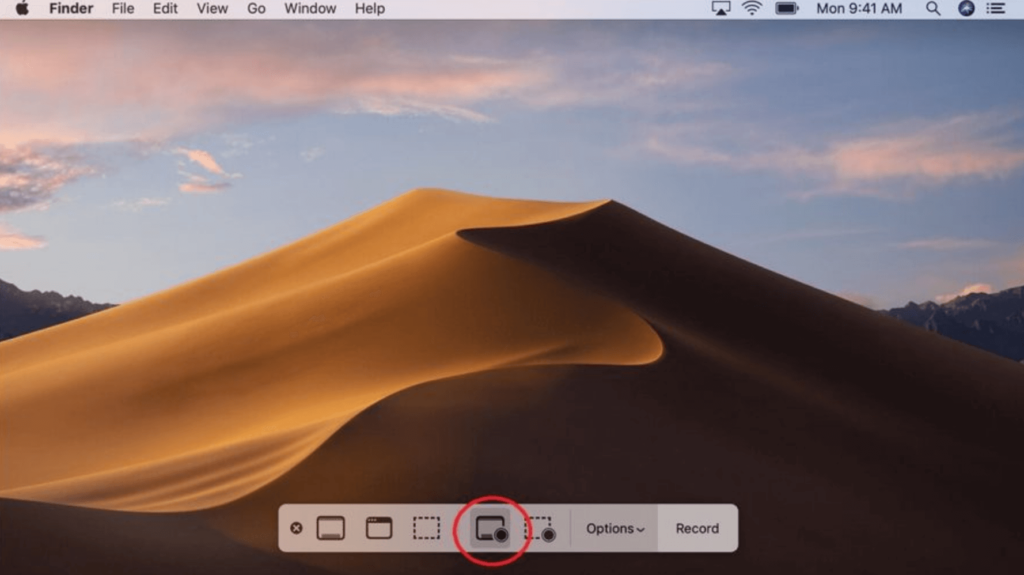
- Click the Capture button on the far right to take the screenshot.
- There's also a menu labeled Options. This menu lets you choose where to save your screenshot, how much time you want between pressing Capture and the screenshot being taken, and more.
The Options menu also has the Show Floating Thumbnail option, which is turned on by default and will have a checkmark on the left. This option makes a tiny thumbnail appear in the bottom-right corner of the screen when you take a screenshot.
The screenshot won't be saved to your computer until this thumbnail disappears after a few seconds.
That's all! That's how you can take screenshots on a Mac computer.
Best Screenshot Software for Windows and MacOS Computer

1. Snagit
Snagit is a versatile screenshot and screen recording tool available for both Windows and MacOS. It provides a comprehensive suite for capturing, editing, and sharing visual content, making it a go-to solution for professionals and casual users alike.
Key Features of Snagit
- All-in-One Capture and Editing: Snagit allows users to capture screenshots, record videos, and create GIFs. Its powerful editing features include annotations, effects, and the ability to add shapes and text.
- Panoramic and Scrolling Capture: With the ability to capture entire web pages or long documents through panoramic and scrolling capture, Snagit ensures users can capture content beyond a single screen.
- User-Friendly Interface: Despite its advanced features, Snagit maintains an intuitive and user-friendly interface, making it accessible for users of all levels.
2. LightShot
LightShot is a user-friendly and lightweight screenshot tool compatible with both Windows and MacOS. It excels in providing a quick and straightforward way to capture and share screenshots.
Key Features of LightShot
- Quick and Customizable Capture: LightShot offers a simple and customizable screenshot capturing process, allowing users to select specific areas or capture the entire screen swiftly.
- Direct Online Sharing: Users can quickly share their screenshots online, streamlining the sharing process without the need for additional steps.
- Minimalistic Design: With a minimalistic design, LightShot provides a clean and straightforward interface for users who prefer simplicity.
3. Monosnap
Monosnap is a versatile screenshot tool available on both Windows and MacOS, offering a combination of screenshot capture and screen recording capabilities. It stands out with its focus on collaboration and cloud integration.
Key Features of Monosnap
- Capture and Screen Recording: Monosnap goes beyond screenshots, allowing users to capture screen recordings, making it a comprehensive solution for visual communication.
- Annotate and Edit: Users can annotate captured images with a range of tools, adding arrows, shapes, and text. This feature enhances the ability to convey information clearly.
- Cloud Storage and Sharing: Monosnap integrates with cloud storage services, facilitating easy sharing and collaboration by allowing users to store and access their screenshots and recordings online.
These top screenshot tools for Windows and MacOS offer a diverse range of features to cater to various user needs, from basic capturing to advanced editing and collaboration. Choose the tool that aligns best with your preferences and requirements for an enhanced screenshot experience.
Also Read: 6 Product Photography Best Practices to Boost Ecommerce Conversion Rates
Top 3 Cross-Browser Extensions to Take Screenshots on a Computer

The most convenient way to take screenshots on a computer is to use an extension that supports every major browser. When you are using an extension, you'll have a quick and accessible way to capture screenshots without the need to open external applications.
Also, many extensions allow users to capture screenshots with just a single click, streamlining the process. Now let's discuss the top 3 extensions that you can consider to take screenshots on a computer:
Certainly! Here are three popular cross-browser extensions that allow you to take screenshots across different web browsers:
Related: 15 Most Useful Chrome Extensions for WordPress Users & Devs
I) Nimbus Screenshot
Nimbus Screenshot is a versatile and user-friendly extension available for various web browsers. It offers not only screenshot capture capabilities but also features for recording screencasts and annotating images.
Key Features
- Flexible Capture Options: Capture entire web pages, selected areas, or the visible part of a page.
- Annotation Tools: Annotate screenshots with text, arrows, shapes, and more.
- Screencasting: Record screencasts along with audio narration.
Available on Chrome, Firefox, Edge, Opera, and Brave.
II) Fireshot
Fireshot is another powerful extension available across different browsers. It stands out for its comprehensive screenshot capture and editing capabilities.
Key Features
- Web Page Capture: Capture entire web pages, including long scrolls.
- Versatile Editing Tools: Annotate and edit screenshots with various tools and effects.
- Direct Sharing Options: Share screenshots directly through email or social media platforms.
Available on Chrome, Firefox, Edge, and Opera.
III) Awesome Screenshot
Awesome Screenshot & Screen Recorder is a versatile and widely-used extension available for multiple browsers, including Chrome, Firefox, and Safari. It not only offers powerful screenshot capabilities but also provides tools for annotation, editing, and screen recording.
Key Features
- Capture and Annotate: Capture screenshots of entire web pages or specific areas and annotate them with text, arrows, and shapes.
- Cloud Storage: Save screenshots directly to the cloud for easy access and sharing across devices.
- Screen Recording: Record screen activity and capture video recordings, adding to the extension's versatility.
Available on Chrome, Firefox, Edge, and Opera.
Now choose an extension that suits your requirements and seems easier to use.

Are you Now Confident to Take a Screenshot?
We started this tutorial by saying that taking screenshots is extremely easy. Now what do you think? Is it hard or easy?
We reckon it's much easier than it seems to hear. There are several ways to take screenshots on a computer. You can follow any of them to get your job done based on which operating system you're using.
We have also discussed further easy ways to take a screenshot on a computer by using any screenshot software or extension. So, follow the most convenient method for you to take screenshots.
That being said, if you have any more queries regarding how to take a screenshot on a computer, feel free to let us know using the comment box below. We always appreciate your queries. Thank you!