

Digitally created snow can often be quite difficult to generate in Photoshop, in a realistic-looking way. We recently published a tutorial showing how to add snow to a still image, so in this tutorial, we decided that it would be fun to show how to create a realistic-looking animated snowfall effect in Photoshop, and then turn it into an animated GIF file. Let's get started!
Tutorial Assets
To complete the tutorial you will need the following assets:
- Central Park in Winter - Photo by Grant Friedman
Un-Narrated Video
This video was recorded during the process of creating this tutorial. Unfortunately, we were unable to record audio for this video, so it is silent. We wanted to include it with the written portion of this tutorial just in case it could be of some help.

1. Create the Snowflakes
Step 1
Create a new document 800 px by 800 px.


Step 2
Select the Brush Tool (B) and set the Size to a small number such as 4.


Step 3
On a new layer, paint some black dots randomly over the canvas. Each dot will become a single snowflake. Name this layer Snowflakes. It’s important to avoid grouping too many snowflakes in one area.


2. Set Up Animation
Step 1
Before we start animating the snowflakes, it’s important to consider how they fall. As snowflakes fall from the sky, I envision that they float back and forth in their descent, giving them a graceful appearance. (See image below). Following this interpretation of falling snow, we can identify two motions; falling (downward) and floating (side-to-side). To animate falling snow, we will start with the slight side-to-side motion.

Step 2
Open the Timeline Panel (Window > Timeline).


Step 3
The Timeline Panel appears, but it will not display a timeline at first. Instead, a single button appears asking which timeline you want to use. Make sure to select Create Video Timeline.


Step 4
Now that a video timeline has been created, two layers should be visible in the timeline—these correspond to the two layers in the Layers Panel. In the Timeline Panel, click on the arrow next to the Snowflake layer in order to reveal the animation properties.


Step 5
Make sure the playhead is position at the first frame and click on the stopwatch icon to Enable Keyframe Animation. This will automatically place a keyframe on the first frame.


Step 6
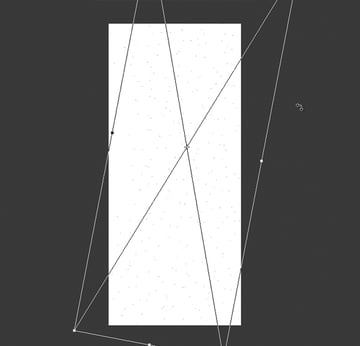
Before we add motion, it helps to set up some guides. Zoom in to one of the snowflakes and place a vertical guide over it.


Step 7
Place two more guides on either side of the snowflake. This will represent the distance we will move the snowflake side-to-side.
Tip: Use the Ruler Bar (Command/Ctrl + R) to make sure the two guides are equal distance from the center guide.


3. Animate Side-to-Side Motion
Step 1
Now that our scene is set up and keyframe animation is enabled, we can start moving our snowflakes to animate. Move the playhead to the one second marker (1:00f) on the timeline and, using the Move Tool, move the snowflake until it reaches the left guide.
Tip: Holding shift will constrain the movement horizontally.


Step 2
Next, advance the playhead to the three second marker (3:00f) on the timeline and move the snowflake to the right guide.


Step 3
Finally, advance the playhead to the four second marker (4:00f) and move the snowflake back to the center guide.


Step 4
Since our animation is going to play over four seconds, we need to set the end of the work area to the four second marker. Drag the End of Work Area marker to the four second marker (4:00f). Also, click on the flyout menu in the top-right of the Timeline Panel and choose Loop Playback.


Step 5
Press Spacebar to preview the animation.


Step 6
After looking at the animation, the snowflake’s movement is too harsh. This can be softened by adding some additional keyframes. Drag the playhead just before the one second marker (1:00). Note the position of the snowflake.


Step 7
Using the Arrow keys, nudge the snowflake closer to the guide.


Step 8
Repeat this for the other side of the one minute marker (1:00f)


Step 9
Do the same thing at the three second marker (3:00f).


Step 10
Preview the animation by pressing Spacebar. By nudging the snowflakes closer to the guide, we’ve made it ease in and out of the direction change (thus, giving it a more natural movement).


4. Set Up for More Animation
Step 1
Now that the snowflakes have a side-to-side animation, we need to make sure that none of them are being animated off the canvas. Check the edges of the animation for disappearing snowflakes and use the Eraser Tool (E) to remove them.


Step 2
Click the eye icon on the Background layer in our Layers Panel. This will hide the white layer so our snowflakes appear on a transparent background.


Step 3
Select both layers in the Layers Panel and right click. Choose Convert to Smart Object. It is important that both layers are selected.


Step 4
The next step is to expand our canvas to make room to animate the falling snow. Using the Crop Tool (C), grab the bottom edge and pull downward to extend the canvas. Holding Alt will extend the canvas equally in both directions.


Step 5
Create a new layer below the Snowflakes layer and Fill with white.


Step 6
Position the Snowflakes layer towards the top of the canvas.


5. Animate the Downward Motion
Step 1
In the Timeline Panel, click the arrow on the Snowflakes layer to reveal the animation properties. Note that the Position property has been replaced by the Transform property since this is now a smart object.


Step 2
Slide the End of Work Area marker to the four second marker (4:00f).


Step 3
Move the playhead to the first frame and click the stopwatch icon to Enable Keyframe Animation and to place a keyframe at the first frame.


Step 4
Move the playhead to the four second marker (4:00f) and use the Move Tool (V) to drag the Snowflakes layer to the bottom of the canvas.


Step 5
Press Spacebar to preview the animation. As you can see, the snow now falls gracefully with a slight side-to-side motion. In the next few steps, we will fill in the snow to cover the rest of the canvas.

6. Add More Snow
Step 1
Make a duplicate copy (Layer > Duplicate Layer) of the Snowflakes layer. This can also be done in the Layers Panel by dragging the layer over the Create a New Layer icon. Duplicating the layer retains the animation. Note: pressing Command/Ctrl + J will not work as it does not copy the animation properties over.


Step 2
Move the new layer down the timeline to around the tenth frame marker (10f).


Step 3
Press Spacebar to preview the animation. The snow now continues to fall from the top of the canvas.

Step 4
Continue this technique until the entire canvas is covered with falling snow. It may be necessary to adjust the keyframes manually for some of the layers.

Step 5
Notice how the snowfall appears too uniform. To add some variation, we can create another duplicate layer and keyframe it to fall at a faster rate than the rest of the snow.
To add even more variation, modify the keyframes of some of the layers to move faster or slower. Just make sure that there are no gaps in the snowfall.

Step 6
Select all Snowflakes layers and Convert to Smart Object.


7. Add Variation to the Snowfall
Step 1
The snowfall is starting to look better, but there’s still more that can be done. In the next few steps, we’ll add more variety and density to the snowfall. Start by making a Copy (Command/Ctrl + J) of the Snowflakes layer (since all of the animation is inside the smart object, we can copy the smart object and still retain the animation).
Make sure the playhead is at the first frame so our layer animates the entire four second.


Step 2
Transform (Command/Ctrl + T) this layer so that it’s slightly larger and rotated off-center.

Step 3
Make another Copy (Command/Ctrl + J), and resize and rotate it in the opposite direction. This will cause the snow to crisscross, giving it a more realistic behavior.


Step 4
Continue adding new copies of snow and transforming them in different ways in order to add variation to size and speed (a layer that’s been increased vertically will appear to have faster snowfall that one that's been decreased vertically). Be careful not to overdo any of the transformations.


Step 5
Press Spacebar to preview the results. Since we’ve been adding layers and layers of animated smart objects, Photoshop may slow down a little while trying to render a preview.


Step 6
Lastly, make sure the End of Work Area has been moved to the four second marker (4:00f). When you’re satisfied with the results, select all layers and Convert to Smart Object. Rename the layer to Snowfall. Save (Command/Ctrl + S) the file.


8. Preparing an Image for Snow
Step 1
Now that the snowfall has been created, we can work on getting an image ready to receive the snowfall. Open the image of your choice. In this case, I am using a photograph by Tuts+ Photoshop Editor, Grant Friedman of Central Park.


Step 2
The next step is to crop the photo. I’m never a big fan of cropping photos that aren’t mine. However, since the final result will be a square GIF, it needs to be done. Use the Crop Tool (C) and set the aspect ratio to 1:1 (Square).


Step 3
Adjust the onscreen crop guides to crop the image to 600 px by 600 px. Click the check mark (or press Enter) to commit to the changes.


9. Add Snow to a Photo
Step 4
Go to our snowfall document and click on the canvas and drag the layer up to the document tab that contains the photo. Hovering over the tab will open the document. Continue to drag over the photo document and release the mouse button. The smart object should be placed on top of our photo.


Step 2
If the Timeline Panel is not already open, go to Window > Timeline. Click on the button to Create Video Timeline.


Step 3
Slide the End of Work Area to the four second marker (4:00f).


Step 4
Press Spacebar to preview the animation. As mentioned before, it may take a little bit of time for Photoshop to render the animation. The snowfall should be easy to see since it’s all in black (we will change this later).


10. Fill in the Photo with Snow
Step 1
Now it’s time to add layers of snow to the photo. Start by resizing (Command/Ctrl + T) the Snowfall layer so it’s just larger than the canvas.


Step 2
Copy (Command/Ctrl + J) the Snowfall layer and Transform (Command/Ctrl + T) it to fit in the area towards the back of the path. Since this snow layer is smaller, the snowfall will appear slower, just like in real life.


Step 3
In order to prevent the snow from appearing and disappearing suddenly from the top and bottom of the layer, we need to add a layer mask. First, hide the original Snowfall layer (we want to see the copied layer clearly). Next, click on the Add Layer Mask icon and use a large, soft brush to mask out the top and bottom of the layer.


Step 4
Press Spacebar to preview the animation. The snow should appear to fall behind the tree line and stop on the ground in the far distance.


Step 5
Make a Copy (Command/Ctrl + J) of this layer and resize it (Command/Ctrl + T) to be a little larger than the previous layer. This layer of snow should appear to be half way down the path.
The layer mask will copy over as well. Edit this for the larger snow layer.


Step 6
Make another Copy (Command/Ctrl +J). This time, throw away the layer mask in the trash icon at the bottom of the Layers Panel. Photoshop will prompt you on what to do with the layer. Select Delete.


Step 7
Resize this layer . Continue to make additional copies and Transform (Command/Ctrl + T) them in different ways to add variation.


Step 8
Next, create another Copy (Command/Ctrl + J) and resize the layer to around 175%.


Step 9
Add a Gaussian Blur (Filter > Blur Gaussian Blur) with a Radius of 2.9 px. This will provide the illusion that snow is out of focus, falling right in front of the camera.


Step 10
As an optional step, add a small amount of Gaussian Blur to the two back most layers.


11. Finalize the Snow
Step 1
One of the last things that need to be done is to make the snowflakes white. To do this, double-click one of the thumbnails of the Snowfall smart objects. This will open up that smart object for editing. Make sure to unhide the white background layer.


Step 2
Next, add the Invert adjustment layer to the top of the layer stack. The result should be white snow on a black background.


Step 3
Save (Command/Ctrl + S) the smart object document and go back to the working document. You may notice that the photo is no longer visible. Select all Snowfall layers and change the Blend Mode to Screen.


Step 4
Press Spacebar to preview. All of the layers of snow that we added have created a parallax effect, creating the appearance of depth to the snowfall.


12. Modify the Snow
Step 1
Since everything was created using smart objects, we can easily edit the snowfall. In this case, the snow could appear to be thicker and maybe a little softer. To edit the snow, double-click the thumbnail of one of the smart objects.


Step 2
If the snowfall looked too uniform in our first preview, then take time here to reposition and resize the Snowflake layers until you are satisfied with the variation.


Step 3
Continue to double-click each smart object until we get to the original Snowflakes layer.


Step 4
Double-click the Snowflakes layer and add a black Outer Glow layer style using the settings below. Click OK.


Step 5
Save (Command/Ctrl + S) and Close each smart object document until we get back to our snowfall scene. Press Spacebar to preview the animation. The snow looks much better.


13. Create the GIF
Step 1
The quickest way to create a GIF is usually to use the Save for Web option. However, since we’ve used a lot of layered smart objects to build our scene, Photoshop will undoubtedly slow down when trying to process all that information. Instead, we will first create a video file. Go to File > Export > Render Video


Step 2
In the Render Video panel, change the settings as you see fit, or use the settings below and click Render.


Step 3
Once the file has finished rendering, locate it on your computer and open it back up in Photoshop. Photoshop should automatically open this as a video file


Step 4
Now, go to File > Save for Web and adjust the settings to your liking and click Done. If you want your animation to loop, make sure to turn on looping. For more information on how to optimize a GIF file, check out Martin Perhiniak’s post 10 Ways to Optimize an Animated GIF File.


Congratulations! You're done.
In this tutorial, we've learned how to take a traditionally complex animation—like falling snow—and break it down into several simple animations with the help of smart objects. Hopefully, this tutorial has shown you how easy animation in Photoshop can really be.
.jpg)

